6.2 KiB
Pairing with QR Codes
Pairing a HomeKit device using its 8-digit Setup Code requires you to:
- Select the specific HomeKit device to pair from a list of unpaired HomeKit devices the Home App finds on your local network
- Input the Setup Code for that device into the Home App.
The order of the steps above depends on whether you manually type the Setup Code, or scan it from a printed tag.
In contrast, pairing a HomeKit device with a QR Code requires you to only scan the QR Code. You do not need to identify the device you want to pair. The Home App will instead search for it on your local network and, if found, pair to it automatically.
This is possible because the QR Code includes a 4-character Setup ID that is unique to the device associated with the QR Code. The QR Code also embeds other paring information about the device, such as its Category (e.g. Light, Fan, Door) and its 8-digit Setup Code.
HomeSpan supports pairing with QR Codes and uses "HSPN" as its default Setup ID. However, if you have more than one device that you intend on pairing with a QR Code, you'll need to change each device's Setup ID from "HSPN" to something unique using the method homeSpan.setQRID(const char *ID) (see the HomeSpan API Reference for details). If you do not intend on pairing your devices with QR Codes, it is fine for them to all have the same Setup ID, as this ID is only used to initiate the pairing process via a QR code and serves no other purpose.
Creating Scannable QR Codes
Just as you can create your own scannable tag based on a HomeSpan device's Setup Code (see the HomeSpan User Guide, you can also create your own scannable QR Code for pairing a HomeSpan device. Perhaps the easiest method is to use Apple's HomeKit QR Code generator including with its HomeKit Accessory Simulator add-on for Xcode.
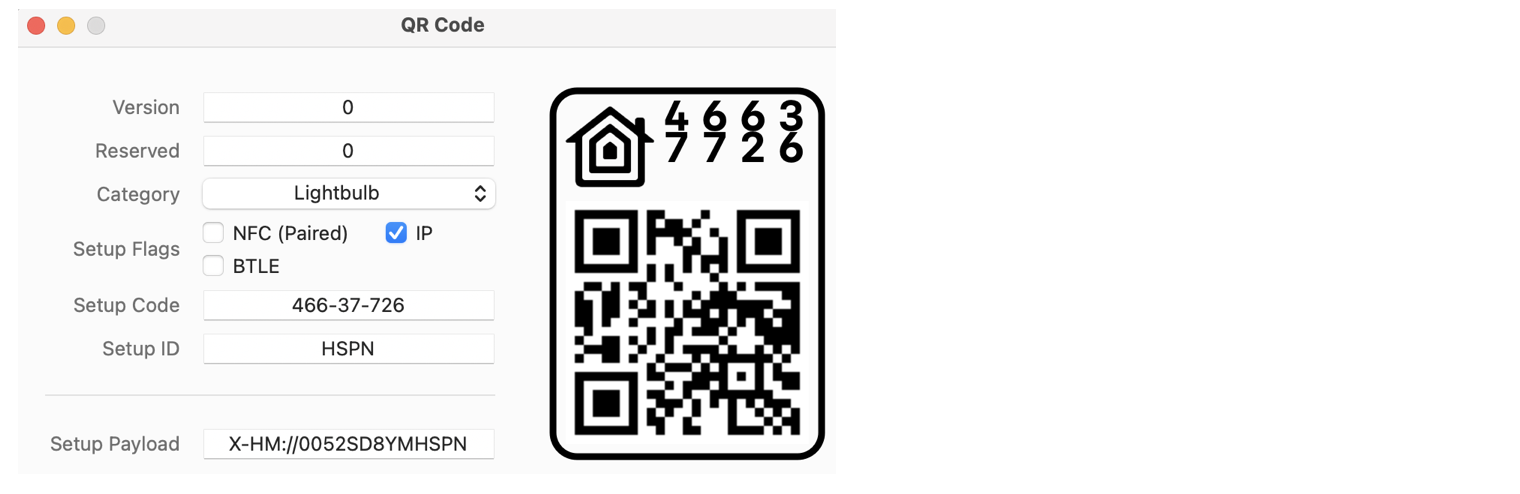
As shown above, the Simulator's QR Code Generator requires the input of the following fields:
-
Version. Always set this to zero, else the Home App will not recognize the QR Code.
-
Reserved. Always set this to zero, else the Home App will not recognize the QR Code.
-
Category. Set this to match the Category of your HomeSpan device (e.g. Lightbulb, Fan, Door Lock). Note the Home App only uses this for display purposes when you first scan the QR Code. The Home App does not actually check that the Category listed in the QR Code matches the Category of the device you are pairing.
-
Setup Flags. These flags provide information on which methods of pairing are supported by a HomeKit device. HomeSpan only supports IP Pairing, so you check that box and leave the other two blank. However, it does not seem to matter which boxes (if any) you check since the Home App does not appear to use this information for anything.
-
Setup Code. This is the 8-digit Setup Code you set for your device using either the HomeSpan Command-Line Interface (CLI) or HomeSpan's Setup Access Point. Note the code shown in the above screenshot is the default HomeSpan uses if you do not set your own.
-
Setup ID. This is the 4-character Setup ID you set for your HomeSpan device from within your sketch using the method
homeSpan.setQRID(const char *id). Note the ID shown in the above screenshot is the default HomeSpan uses if you do not set your own. Also note case matters! HSPN is not the same as "hspn". -
Setup Payload. This is the output that results from the above inputs, and is the text that is represented by the QR Code shown. If you've not changed HomeSpan's default Setup Code or Setup ID, you can pair your device by scanning this graphic with the Home App. Even easier is to scan it right from your camera - your iPhone will recognize that this is a HomeKit QR Code and open the Home App for you.
You probably noticed that this QR Code contains Apple's HomeKit logo in the upper left. This is purely cosmetic and not required by the Home App for pairing. Similarly, the device's 8-digit Setup Code shown in big numerals in the upper right is also cosmetic and not needed for pairing, though it may be handy if you have problems scanning the QR Code and need to manually enter the Setup Code into the Home App.
The only portion of the graphic actually scanned by the Home App is the QR Code itself, which means that you can use any generic QR Code generator instead of Apple's version, provided the generator allows you to create a QR Code from arbitrary text (most do).
The text input you'll need to provide to a generic QR Code generator is of course the Setup Payload. There is a relatively straightfoward algorithm you can follow to determine the Setup Payload for your device based on all the inputs (see below), but its even easier to let HomeSpan do it for you.
HomeSpan outputs its Setup Payload to the Arduino Serial Monitor whenever it generates a Setup Code or you set/change the Setup Code. Simply copy the Setup Payload from the Serial Monitor into a generic QR Code generator, and viola, you have a scannable QR Code you can use to pair your HomeSpan device.
Setup Payload (optional reading)
The format of the Setup Payload is the URL "X-HM://" followed by 9 data characters, followed by the device's 4-character Setup ID.
The data characters are a base-36 representation (using the characters 0-9 and A-Z) of a 45-bit word formed from the following fields:
- Bits 0-26 - The device's 8-digit Setup Code (from 0-99999999)
- Bit 27 - Set to 1 if the device supports NFC pairing, else set to 0
- Bit 28 - Set to 1 if the device supports IP pairing, else set to 0
- Bit 29 - Set to 1 if the device supports BLTE pairing, else set to 0
- Bit 30 - Always set to 0
- Bits 31-38 - The device's Accessory Category (0-255)
- Bits 39-42 - The "Reserved" field. Always set to 0.
- Bits 43-45 - The "Version" field. Always set to 0.